Canard Critical Dimensions
Canard Critical Dimensions Other Canard Dimensions Concentric Torque Tube Dimensions Concentric Torque Tube Dimensions
Read More
Canard Critical Dimensions Other Canard Dimensions Concentric Torque Tube Dimensions Concentric Torque Tube Dimensions
Read More
The first hard point we made on the Keel is this “house” shaped one on the pilot’s side for front control rod bracket. It’s 5-3/4″ at the peak with a 5″ tall by 5.5″ wide. It’s is attached on the inside of the keel with micro, with a small fillet or sand the edges (we […]
Read More
In this section we mounted the aileron control torque tube mid-bearing support bracket on the inside of the keel, along the pre-marked line on the keel. With the rear bearing support located, we measured where the torque tube lined up inside the keel and located the 1″ hole on the support rib. We then sanded […]
Read More
In this section we installed the control stick onto aileron control torque tube. On this piece, it’s important to note that due to the saddle connection, there is only one proper way for it to get installed, and that the outside end is threaded to accept the bolt so no nut is required. Also installed […]
Read More
Once the control assembly was installed we permanently installed the keel with structural adhesive and rivets. The manual recommends also installing the speed brake mounting channel to the keel prior to permanently affixing it, and I would recommend this in hindsight, but this is the way Frank recommended it during Head Start. Also installed in the keel is […]
Read More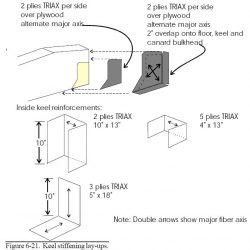
Once the keel is installed, you need to do series of stiffening lay-ups with Tri-axial cloth. There are four inside the keel, one runs along the floor and up onto the canard bulkhead (3 plies of 5″x18″, running 10″ onto the bulkhead), one left to right (2 plies of 10″x13″ with the 10″ side running […]
Read More